List Gadget
To add a new list gadget:
- Click List from the Gadget Wizard. A list of entities is displayed.
- Select the entity to base your gadget on from the list.
- Click Next. A list of data sources, grouped by type (Group, Report, Saved Advanced Find, Saved Search) is displayed.
- Select the data source to base your gadget on from the list. Use the Filter by field to narrow the list. The Filter by field works on a "Begins with" basis.
- Click Next. A list of columns available to display on the gadget is displayed.
- Click the check box next to the columns you want to display on the gadget, or click Select All. The number of records to display per page of the gadget defaults to 10. This can be changed in the No. Of Rows field.
- Click Next.
- Select the Drill Down option from the drop-down field. Go To List Or Report displays an Action icon in the gadget header once the gadget is on the dashboard. Clicking on the Action icon drills into either the report search criteria page (for report data sources) or to the associated list of a saved search, advanced find, or group data sources.
Drill Down Action icon on gadget header
- Select the Default Action option from the drop-down field. Setting a Default Action adds a column displaying an icon next to each record in the gadget. The selected action is launched when you click on the icon:
- Go To Summary Screen. Opens the summary screen of the selected record.
- LinkedIn Search. Carries out a search on the Person Last Name and/or the Company Name from CRM in LinkedIn. The user must have a LinkedIn account, and will be prompted to logon the first time they use the action.
- New Appointment. Creates an appointment, using the context details of the selected record.
- New Task. Creates a task, using the context details of the selected record.
- New E-mail. Creates an e-mail, using the context details of the selected record.
- Select the Display Workflow Anchor Column check box to add an Action column to the gadget. When you click on the icon in the Action column, the workflow actions relating to the current record can be launched.

Default Action Go To Summary Screen icon (left) and Workflow Anchor Column icon (right)
- Click Next.
- Add a Name and Description for the gadget.
- Click Finish.
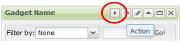
Once the List gadget is on your dashboard you can:
- Use the Filter by drop-down list and field to narrow the selection further. The Filter by field returns data containing the text entered. You can filter by any "string" (character) type of field, which is displayed on the gadget. You cannot filter by numeric or date/time fields.
Go to Interactive Dashboard home page...
See Also:
Gadget Quick Reference
Linking Gadgets